|
Fan Clutch Removal Mod
This is a trick develped by the PTG race team's engine specialists for all E36 I6 engines and is dyno proven. The reduction in parasitic drag is equivilent to a 6-8hp increase. Removing the driven fan does reduce the cooling efficiency somewhat, but only while the car is moving less than about 10MPH. However by lowering the thermostat temperature, using Red Line Water Wetter and by using a lower temperature fan switch the risk of overheating is eliminated. It is advised that those running forced induction or living in very hot areas of the country (southern FL, AZ, etc) either skip this mod or add an additional high CFM aftermarket electric fan. Another option is to reinstall the fan only during the hotest weeks of the summer while leaving the fan switch and thermostat in place. It only takes about 15 minutes to remove or reinstall the fan itself.
In addition to performance increase removing the fan eliminates the risk of the fan blades coming in to contact with the radiator due to a broken motor mount or faulty waterpump bearings. The fan blades can do significant underhood damage if they contact the radiator or if a broken fan belt wraps around them. Also changing belts is very easy with the fan out of the way.
Don't complain if you skip the thermostat or switch and your car overheats. Make sure you follow the directions and you'll be fine.
If you have a '92 - '96 325/328/M3 and you're not 110% sure that the original waterpump has not been replaced with a metal impeller waterpump, REPLACE YOUR WATERPUMP. See my waterpump write up for deatils on how to replace it. Waterpumps are cheap ($30-$80) and are very easy to replace especially when you already have everything apart to replace the thermostat. Trust me, REPLACE IT! The original orange plastic impeller waterpumps will fail with absolutely ZERO warning causing your engine to overheat. That will leave you stranded and may cause extensive damage to your engine in the process. Even if you're not doing this fan mod, REPLACE YOUR WATERPUMP.
Instead of driving all over town trying to find all the parts you need for this mod, you can now order a parts kit on-line at shop.understeer.com!
You will need the following parts:
- 2 Bottles of Red Line Water Wetter
- 11 53 1 466 174 80c Thermostat
- 11 53 1 265 084 O-ring
- 11 53 1 740 437 (5/92-up) / 11 53 1 748 047 (up to 5/92) Thermostat Housing Gasket
- 61 31 8 361 787 (up to 9/95) / 61 31 8 376 440 (9/95 and up) 80/88c Fan Switch
- 32 41 1 093 596 Fan Switch Sealing Ring
- BMW Coolant
- Distilled Water
Remove the four screws and the two plastic screw/plugs that attach the front cover panel, then remove the panel
Drain the coolant from the radiator using the drain plug on the bottom driver side corner.
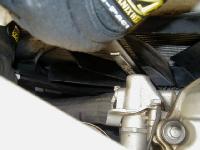
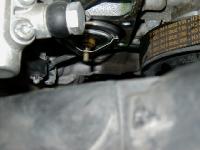
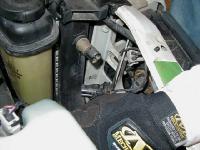
Use a fan clutch removal tool (or a big screwdriver) to hold the waterpump pulley in place. Loosen the the fan clutch using a 32mm wrench. The threads are reverse rotation, so turn it CLOCKWISE to loosen. Once the fan clutch is loose, remove the wrench, spin the fan clutch the rest of the way off with your hand. Once the fan is completely off carefully fish it out from between the engine and the radiator, it may take a little force.
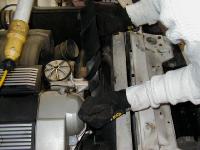
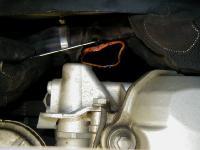
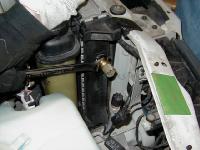
Use a 10mm socket to first three bolts securing the thermostat housing to the engine. Then use a 13mm socket to remove the final bolt, that bolt also attaches an engine lift hook, remove the other bolt attaching that lift hook also and remove the hook. Pull the thermostat housing away from the block and, if you left the hoses attached, secure it out of the way somehow.
Use a screwdriver to remove the old therostat from the block.
Install the new 80c thermostat in the block along with the new o-ring seal
Use a pick to remove the old housing seal and press in the new one. On a '92 with an original aluminum thermostat housing, the housing is sealed to the block with a paper gasket instead, use some gasket sealant to attach the paper gasket to the housing then use some more gasket sealant on the block side of the gasket.
Reinstall the thermostat housing starting with the three smaller bolts. Once those are started, put the lift hook back in place and reinstall the two larger bolts. Don't over tighten the bolts or you may crack the thermostat housing! I'd recommend using a 1/4" drive socket to limit your torque so that you're less likely to get too crazy tightening.
Reinstall the front cover panel.
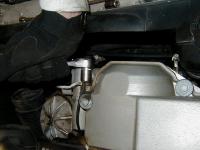
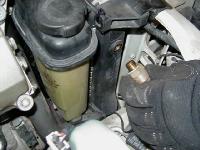
Disconnect the plug from the fan switch on the passenger side of the radiator. Remove the fan switch with a 22mm wrench.
Install the new fan switch using a new sealing ring. Don't over tighten it! On 9/95+ cars using the #440 fan switch, you have to cut off the plastic tab on the side of the connector or else you can't plug it in. Just use a razorblade or an X-Acto knife. It's very simple, you'll see.
Next, you need to refill and bleed the cooling system. It really helps to have a friend lend a hand by sitting in the car revving the
motor and keeping an eye on the temp gauge. Start off by removing the coolant
reservoir cap and the plastic bleeder screw right next to it. Fill the coolant
reservoir with a 50/50 mix of coolant and distilled water. Have your friend
start the car, turn on the heater to full hot on the vent position and rev the
motor to about 2500 RPM, if the temp gauge goes past the 12 o'clock position,
shut the motor off, let it cool down and start over again. Watch the coolant
reservoir, as the engine warms up the coolant level should drop, refill as the
coolant is sucked out of the reservoir. Watch the bleeder screw hole also,
when coolant with no air bubbles begins to overflow then you're almost done.
It's a good idea to have some paper towels handy to mop up any overflow. Screw
the bleeder screw back in (be careful to not break the plastic screw) and
continue to rev the motor, you should see a continuous stream of coolant
spraying in to the reservoir from the small hole at the top. Continue letting
that spray in to the reservoir while your friend revs the motor for a couple
of minutes, until the gauge hits the 12 o'clock mark, to ensure any remaining air is gone. If the heater is blowing hot air when you're revving the motor AND when the engine is at idle then your cooling system is properly bled. If your vents are blowing cool air at idle then you still have air in the system, try revving the motor more and/or squeeze the radiator hoses to help dislodge any trapped air. Once your system is fully bled, top off the reservoir and replace the cap. Check the coolant level in a day or two and top off as needed.
Make sure there are no leaks and that your engine isn't overheating. Close the hood and go test drive your new mod!
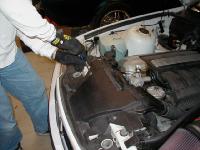
Remove Cover |
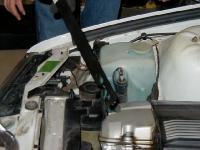
Fan Tool |
Loosen Fan |
Remove Fan |
Thermostat |
Housing Gasket |
Reinstalling Bolts |
Fan Switch |
Sealing Ring |
Tightening Switch |
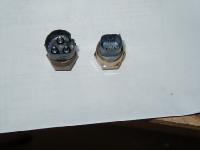
Switches: Pre 9/95 on Left - Post 9/95 on Right |

|